The air mattress is a terrific addition to increasing sleep quality plus spinal comfort during backpacking at such a higher price point. This should give users increased sleeping satisfaction than just a typical roll-up foam mattress.
It has the added benefit of becoming foldable enabling simple storage. However, treating it will necessitate extra caution and delicacy to minimize holes as well as breakage. Today we’ll be talking about how to find a hole in an air mattress, along with tips and steps to follow in doing fixes.
Done! How to Find a Hole in an Air Mattress
Locating a hole in some kind of a leaky air mattress might be a tedious procedure, notably when even little pinhole leaks may lead the sleeper to wake up upon that concrete ground.
Luckily, there may be a few well-known techniques for locating the problem so that it could be repaired as well as put back to some use.
1. Examine Its Valves.
Check the valves before checking for a possible leak inside this air mattress. It’ll also help to reduce the amount of time. Ensure that every lock plug gets fully fitted further into valves. Certain valves consist of two positions.
When the valve is put within the mattress, everything just closes, and once the lock plug gets pressed further into the stem, it provides an additional measure of defense. Make absolutely sure its stem has been inserted all the way into the mattress.
Moreover, look around in the stem for any holes somewhere at the bottom that may have been causing an issue. It won’t be able to restore this valve if it has been broken. Continue if indeed the valve plug has been fitted into the head and the stem has been pressed into the mattress.
2. Make Use of Dish Soap.

Dish soap, a tried-and-true approach for locating defects in swimming floaties, has been one of the most effective methods for identifying a break in an airbed. Load a plastic container halfway using water and add a few drops of liquid detergent. Adding dish soap thickens the mixture, permitting everything to adhere to the mattress top well enough for all of you to locate the hole.
Start only with areas of said mattress that would be most prone to leaking. Inspect potential breaches all around valves, then move on to other seams before actually finishing the remainder of the mattress. When you’ve already found the hole, label it with a marker pen or a strip of sticky tape.
3. Thoroughly Check the Air Mattress.
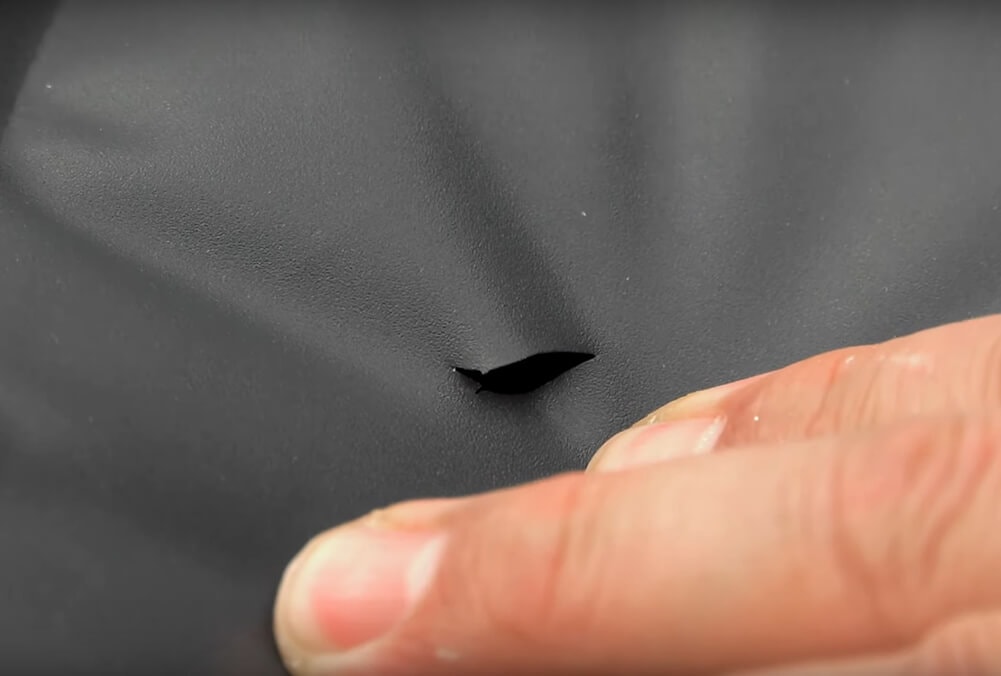
Even if it seems apparent, directly examining the airbed is among the most effective ways to detect a leak. Once you conduct your assessment, make sure the cushion is properly inflated.
When the cushion is expanded, the force upon this material causes even little tiny holes may expand, rendering it increasingly visible. To simplify things to spot potential holes, undertake your check-in in a very well area. Be using a flashlight whenever required to increase visibility.
In any searches, remain systematic. To prevent losing any areas, begin at one side of such a mattress, then work your way in portions. Look for leaking air with your fingertips.
Holes frequently originate at gaps, so inspect each and everyone thoroughly. Then when you’ve found the leak, make an actual note on that with a marker pen.
4. Submerge the Mattress Completely.
Drenching a mattress is amongst the most effective methods for locating a difficult-to-find hole, although it’s perhaps one of the most time-consuming. First, examine the mattress’s tag to ensure that soaking it in liquid would not harm the fabric or stitches. Merely half pump your mattress, as completely expanding this should render submerging harder.
Completely soak your mattress in what seems like a big lake, including a pool, then check for ripples; these suggest air seeping from off the mattress. Be using a bathroom when there isn’t pool access. Continue by immersing the vent and then compressing the cushion to push air out of this one.
Look for any bubbles. Drench the mattress in tiny chunks if the valve fails; that will also make it simpler to notice indicative bubbles. Keep a watch on such an air mattress’s lowest position: its stitching.
5. Make Use of a Yard Hose.
Place the mattress outside on a tabletop, terrace, porch, or garage on a level surface. Fill up the entire mattress in tiny areas with such a hose pipe as well as nozzle, starting only with a valve.
After hosing down the focus, look for just about any pops inside the liquid before everything flows off from the mattress. Whatever bubbles indicate that air is flowing from the mattress, indicating a hole.
While these techniques will aid in the detection of a leak, you may avoid the aggravation of a seeping air mattress simply by exercising action to protect such. Don’t overinflate any air mattress. This one will increase the probability of a rip by putting more pressure on its seams.
Repairing an Air Mattress’s Leak
It’s time to resolve the hole once the afflicted area has been located, washed, then cooled completely. Here are some given options, in a sequence of their potency:
- To use the air mattress repair kit which comes with any of it
- Using an online-purchased third-party air mattress repair kit
- Have used a tyre repair kit on such a bicycle
- To use a shower nozzle or a DIY repair created from a flimsy plastic substance
Decide to follow the company’s directions if you wish to be using a repair kit. Based on the scope and intensity of the leakage and the materials you’re using for the fix, you might have to adapt a bit if you go the DIY route.
Related: How to Clean Air Mattress?
Closing Words
Purists claim that sleeping on the ground is how well-made backpacking is. The spine of some individuals completely disagrees.
When someone is well with a full night’s rest, it really seems to tackle a complete day of outdoor pleasures much tougher. If you can afford it, great air mattresses are rather comfortable, and we expect that they will last you several happy outdoor excursions.